Jan 27, 2016

Sauna drip edge to deflect water from walls and prevent mold.

The idea of a drip edge is simple. The sauna will have heat, steam and possibly water. All this will roll down the cedar walls and towards the floor. To prevent any water accumulation in the corners where the walls meet the floor, we want to deflect the water towards the drain. That’s where the drip edges come in. Basically, drip edges are pieces of “treated” wood around the perimeter of the hot room with a flat area on top the width of a cedar panel board (1/2 inch) sitting on it and a 45 degree slant from there towards the floor to deflect moisture. A photo is worth a thousand words:

Drip edge up close 1
Drip edge up close 1.


Drip edge up close 2
Drip edge up close 2.


To make the drip edge I used a table saw. First, I set the cut width to 1.75 inches and ripped a 2x4 treated piece of wood in half. That left me with two 1.75 inch pieces. 

Table saw blade setting to split a 2x4 in half.

Then, I set the table saw to ½ inch width, set the blade to 45 degrees and cut the 2 pieces of wood. Now I had 2 drip edges. 

Setting a table saw to 1/2 inch width for the 45 degree cut for drip edge.
I then measured the length of each wall that the drip edges will be attached to and made 45 degree miter cuts on each side so the drip edges came nicely together at the wall corners. Now this is why I didn’t glue the 2 sheets of PVC floor liner membrane I put down. I needed the membrane liner to be able to move snugly in to the corner under the drip edge by pushing on the drip edge. Once everything was good, I used a brad nailer to attach the drip edges around the room. Later when I started putting up the cedar tongue and grove, it all worked out very nicely.

A Glimpse In To The Future:
The drip edge is the first piece of wood sitting on the liner. The cedar rests on top of it.

Jan 25, 2016

AFTERTHOUGHT: Making of a waterproof sauna floor.

After having completed all the work from my previous post (http://outdoorsaunabuildmndiy.blogspot.com/2016/01/making-of-sauna-floor.html) There are some steps that I either made improvements on, or wish I had made improvements on. Here they are in no particular order.

DuRock Over Sauna Stove:

For the DuRock protection hanging above the stove, if you recall, we made the 2” air gap using scrap pieces of DuRock. Using those scraps did not make the structure feel solid to me. Instead, I ended up removing those spacers and installing two 2x4s going the width of our DuRock sheet where we previously had the scraps. Once the 2x4s were in place they felt solid-- they were screwed in to the joists in the ceiling through the first piece of sheetrock. Since a 2x4 is actually only 1.5” thick, we added one scrap piece of DuRock in each attachment point over the 2x4 to make up the .5” and give us a full 2” air gap. With the scrap between our protective DuRock and the 2x4, we were able to install the final sheet of DuRock to the 2x4. It was then a solid install as the 2x4s were great anchors for the DuRock and we had the required 2” air gap.
http://outdoorsaunabuildmndiy.blogspot.com/2016/03/hanging-durock-protection-on-ceiling.html

Attaching Waterproof Membrane To Walls:
The next change I realized I way too late is where the waterproof membrane went up the walls in the hot room. If you recall from previous photos, I installed the membrane over the bubble foil insulation on the bottom edges of the walls. Such an install has a chance of condensation running down the bubble foil and UNDER the waterproof membrane instead of in to it. So if I could go back, I would make sure the membrane is nailed to the walls and the bubble foil then would go over the membrane (instead of under). Also, where the foil goes over the membrane, it would NOT be stapled in place (to protect the membrane and keep it waterproof).

Waterproof Membrane Seam On the Floor:

Finally, if you again recall, I ended up having 2 pieces of the waterproof membrane that overlapped each other going down the center of the hot room floor. I held off gluing them together until I was ready to install the drain. However, before gluing them, make sure that the piece that overlaps on top of the other piece, allows for the water to flow freely from top piece to the down piece towards the drain. In other words, make sure the seam between the two pieces does not hold/stop the water from draining towards the drain. I hope that makes sense.

Making of a waterproof sauna floor.

Now that we had both the hot room and the changing room all insulated and cozy, it was time to start getting the hot room floor ready. The installation instructions for the Kuuma wood burning stove call for the ceiling to be protected with a non-combustible material having a 2 inch air gap. So, I bought ½ inch Durock solid cement board for that purpose. The plan was to have 2 sheets of this stuff sandwiched together with a 2 inch space separating them. We first took down measurements from the back wall to the chimney support box. We then transferred those measurements on to our Durock and marked the support box opening with a marker. For making the opening, the best tool I had was an angle grinder. Actually worked out really well.

Using an angle grinder to cut the Durock
  
We then transferred the mirror image of the cutout on to the 2nd sheet. Make sure you have the unmarked side of the Durock board as the visible side when you hang it up on the ceiling. Now that we had two pieces all ready and cut, we needed to hang them. The first sheet goes up with just 2.5 inch non-rusting screws. Then, to make a 2 inch air space, we used scrap pieces of the Durock as spacers. 4 ½ inch pieces make up 2 inches of spacing. For those, we used 4 inch screws to attach the spacers to the joists in the ceiling. The final piece of Durock will then go over the spacers with 4 inch screws.

Durock over chimney support 1
Durock over chimney support with spacers 1

Durock over chimney support 2
Durock over chimney support with spacers 2

Next step was to build a non-combustible pad for our stove to stand on. The big box store has 12”x12” patio pavers that sit about 2” high. I figured 6 of those would be perfect for this project. At under $2 each—this was a great deal. A few things go in to laying the pad. You need to be sure the stove sits on it in such a way that there’s a some slack behind the stove, and that when you open the stove door, if any coals fall out, they fall on the pad—not your floor. Also, you need to make sure that the chimney lines up with the stove and the stove is center on the pad from left to right. Once all that was calculated, the pavers then get glued to the floor with a high heat liquid nails—PL400. One mistake I made is I didn’t apply any glue to the edges of the paver—only the bottom. Applying glue to the edges will prevent water from getting in the cracks between the pavers.

Because I intend to use the sauna to the fullest, I needed the floor to have a drain. I found the best location where I could make all the water run to and marked the spot. Next, I needed to give the floor a slope so that any water from any sides would run down to the drain. To do that, I learned from Glenn of SaunaTimes.com that I need to build sleepers. Sleepers are pieces of wood made in to triangles that start out for me at about 1.5 inch thick at the walls and go down to nothing by the drain. Those can be cut using a table saw. To decide how thick your sleepers should be, simply use a level. The point at which the bubble goes out of level is where you sleeper height can start. Make sure there’s not too much space between the sleepers so that the Durock that will be sitting on top of them wont crack when people walk on it. I did about 6-8 inch gaps. Once I laid all the sleepers out and they looked good, I put down some liquid nails on the bottom side of each sleeper and nailed it to the floor with brad nails.
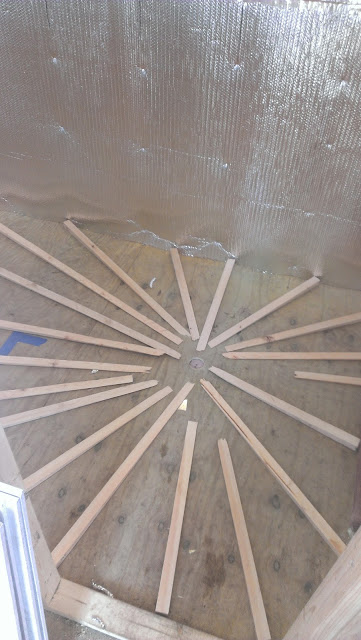
Sleepers create slope towards the drain.

With all the sleepers attached we started putting down the Durock. This stuff comes in sheets of 3x5 feet. I used the ½ “ thick ones. They’re pretty strong yet still bend. Starting in one corner, I laid the first sheet down, pre-drilled the holes through the sleepers and using exterior screws, attached the sheet to the floor through the sleepers. 
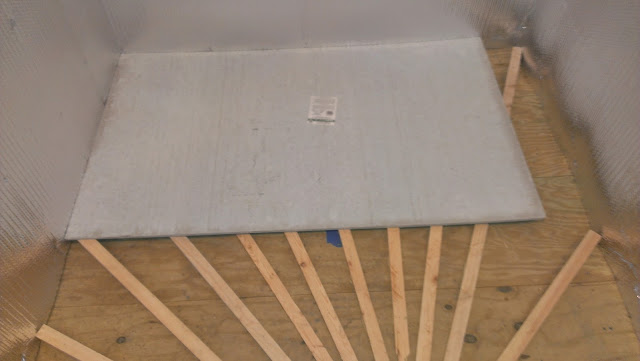
Setting the first floor sheet of Durock
Setting the first floor sheet of Durock.


I tested that the sheet can hold my weight without any soft spots. If it was good, I’d do the next sheet. One thing I learned here is they have special screws for Durock. The plus of those screws is they drive in flush with the board. That way no sharp heads stick out that can cut our waterproof rubber membrane that we’ll be putting on top later.

Floor slope completed. View from one side.

Floor slope completed. View from the opposite side.

Once all the Durock has been attached to the floor, you should be able to see with a level, that the floor slopes down toward the drain no matter where you put the level.

With the floor finally complete which took longer than I wanted to, it was now ready to be waterproofed. There are different techniques to do it. You could put RedGuard over the Durock. However, that needs temps of like 50F+ for it to cure for 72 hrs—it’s the middle of winter now. You could skim coat with cement, but that too requires certain temps and getting dirty. The option I chose is a 40 mil rubber membrane used for waterproofing shower pans. It sells at $5 per liner foot at 4 foot high pieces. So 4 feet x N-number of feet you need x $5. It’s more expensive than skim coating, but cleaner and quicker. Now the stuff you buy at the box store is PVC material. The other option is CPE material which is more appropriate for a sauna, but is only available online and is more expensive. If you have the money, that stuff is used for radiant floors so it withstands like 600F heat. At the money I’m saving, I’m willing to try the PVC stuff as I’ve seen some references to it being used in saunas online. For 25 feet I paid around $100.

The way I used this material is the same way I did it when I did my walk-in shower in the house basement. I started by rolling out my 12 foot roll the long way the length of the sauna making sure I had even overhang on both sides. Then, I took it up the wall about 6 inches on one of the long sides. Using my leftover roofing nails, I nailed 1 inch from the top of the membrane along the wall on every stud. So, in essence, I had half the floor covered with the 4 foot piece and the corner where the wall meets the floor was protected as well. Next I did the same thing on the opposite long wall. I left the 2 short walls unattached as well as the seam in the middle. That was done so that I had slack to install the drip edge along the floor perimeter. Stay tuned for more in the next post.
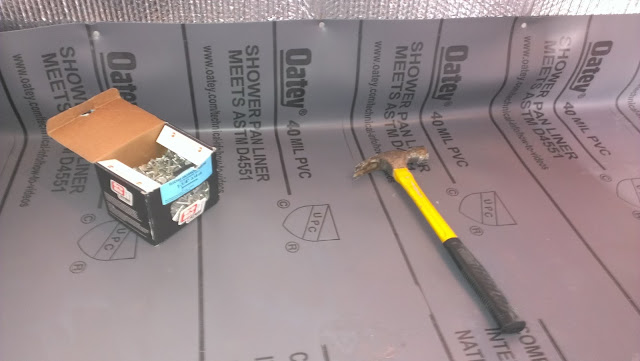
Waterproofing membrane going up the wall 6-8 inches.

Attaching the waterproofing membrane to the wall with roofing nails.

Waterproofing PVC membrane attached only on 2 opposite walls.


Picking up my Kuuma stove!

The first week of December 2015 I finally received the call I was waiting for since September. Daryl of Lamppa Manufacturing called to let me know that the sauna stove I ordered was ready for pickup. This was a big milestone in the sauna build process and I was very excited for it. I really enjoy road trips and visiting new places. Since I’ve never been to the Tower, MN area, I was more than happy to take the drive. I called up a buddy, and off we went. That weekend, we had no snow on the ground in the Twin Cities, however, it was fun to see, driving north, that starting around Hinckley, MN, you could see bigger and bigger snow accumulations.

Snow up north where there's no snow in the cities.


Four hours later, we made it to Tower, MN and Daryl’s small shop where the stoves and furnaces are built. 

Tower, MN home of Lamppa Manufacturing

It was fun to get a tour of the place and see where the stove was made and what it looked like before paint and stuff. It was also interesting to see the wood burning furnace built by Lamppa that heated the whole shop. Finally, Daryl pointed me to my stove sitting among a group of other finished stoves waiting to be shipped across the country. The stove came out better than I expected. Great welding beads, thick metal-- solid built stove. I was impressed. 

My Kuuma wood burning sauna stove front.

My Kuuma wood burning sauna stove side.
I then pulled up my SUV to the loading dock and we loaded the stove in to the back. After a quick stop for dinner, four hours later we arrived at home. It took 3 guys to unload and carry the 350lb stove from my SUV in to the garage where it would wait for the floor and the pad of the sauna to be finished. I may not be able to use the stove yet—but it’s no longer a show stopper once the hot room is ready for it.