You don’t need a snow bank to cool down after a sauna. The evenings here are around 70F degrees and the water coming out of the garden hose is pretty bone chilling. With a few cheap parts, we decided to build a portable outdoor shower which we use in the summer to cool down between sauna rounds. The shower is light and can be moved around the driveway to wherever we need it.
We used only green treated 2x4s and the first thing we built was the base. The base is in a form of an H and pieces are secured by outdoor screws. Then, measuring to our average heights, we cut a 2x4 to attach to the piece of the base that holds the 2 parallel pieces together. This holds the shower head and the water lines. This pieces was attached with 5 screws to the base.
 |
| This is the base of our outdoor shower. Make sure the two side pieces are long enough to make the shower steady. |
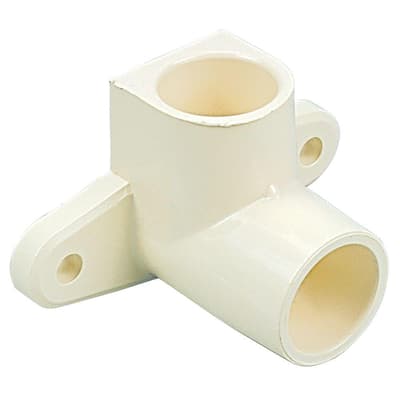
Now, the structure of our shower was complete. Next we attached the water parts. My choice was to build the shower out of CPVC ½” line. It’s easy to work with and is readily available. Make sure you use the CPVC glue for it as well. We started with mounting something called the “drop ear elbow.” Yea, I know, took some Googling on my part to find out the name:
 |
| Drop Ear Elbow. This is where the shower head pipe threads in shown upside down in this photo. |
We mounted it to where our shower head would be, at the top. We screwed it in to the 2x4 with outdoor screws with the input of it facing towards the bottom and the threaded part facing out. Make sure you get the CPVC piece since you’re working with CPVC piping. Once that was attached, we attached the mixing valve to the shower shaft where it was most convenient to operate it. The mixing valve we used is a simple one piece plastic (CPVC) type for around $5.
 |
| A $5 simple plastic mixing valve is all we needed for our outdoor shower. |
You’re now starting to have the general shower layout. Next, we built the water hose input. We wanted to hide it at the bottom of the shower on the opposite side. We bought a “brass to CPVC” fitting and a coupler that threaded in to that fitting on one side and accepted a garden hose fitting on the other side. Next, we drilled a hole all the way through the bottom of the shower shaft that was big enough to hide that brass fitting in.
 |
| Garden hose screws in on the back of the outdoor shower for a cleaner look. |
Once that was done and all fit in, we could start on attaching the lines. Using the ½” CPVC pipe, we cut lengths to size to connect all the components. To get the line through the hole at the bottom, we used a CPVC 90* elbow and a coupling to connect the “brass to CPVC” to the elbow. Remember to insert the pipe all the way in to the fittings and use the orange solder both inside the fittings and around the pipe that’s going in to the fittings. Once attached, you should see the orange solder outside of the joints.
Now that all the main components were connected, we used pipe straps to secure the CPVC pipes to the shower shaft to make things more rigid. Next, we need the stainless shower head pipe. We threaded it in to the “drop ear elbow” using Teflon tape. Afterwards, we attached our cheap $5 shower head to this pipe. Remember, this is an outdoor shower that will stand up to the elements—don’t spend too much on it—unless you want to :)
And with that—the shower was complete. When you build yours, fire up the sauna and give the shower about 20 minutes to cure before you can start running water through it. While the sauna warms up, put some meat on the grill and socialize. By the time you’re done, the sauna will be up to temp, and the shower cured. Go ahead and do a round in the hot room then get under the cold shower water. You will agree, your sauna is not just for winter anymore.
 |
| Fully assembled custom built outdoor shower for after sauna use. Side view. |
 |
| Fully assembled custom built outdoor shower for after sauna use. Front view. |

You read my sauna article on HubPages, so I thought I'd follow your link and see what you were up to on your end. This looks good. For the most part we leave the sauna shut down for a couple of the summer months. Maybe we will give this a try. Good article.
ReplyDeleteI LOVE having an outdoor shower with the sauna! I use it 3 seasons a year (stuck with snow and a bucket in the winter;-).
Delete