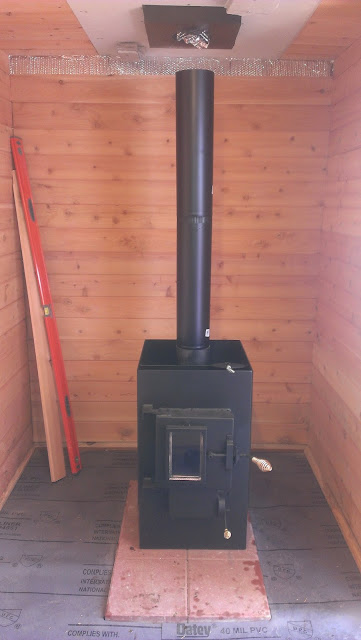
Once we were done with the cedar on the walls and ceiling,
we were ready to get the Kuuma sauna stove installed. First challenge was to
get it in the sauna building. The beast is made of quarter inch metal and weighs
350 pounds and takes in 100 pounds of FireBrick luckily in a separate box J . We wheeled the stove
out of the garage on a dolly, then had 3 guys pick it up and place it in to our
sauna building. Once inside, we set it on top of the patio pavers that it will
live on and adjusted its position to line up with the chimney in the ceiling.
From there, we needed to hook up the stove to the chimney support box with a single
wall black pipe. The pipe comes open and needs to be bent and clicked together
to assemble like a duct pipe. There are 2 sides to each pipe—a crimped side and
a straight side. The pipes are sold in 12 and 24 inch lengths I believe. There
may be others. Once I assembled the pipe in to a round stack, the crimped end
then went in to the stove. My stove had a hole in the receiving pipe for a
sheet metal screw to secure the pipe. I put in my pipe, marked the hole
location, took the pipe out, tapped and drilled the hole out.
 |
| Single wall black pipe hooked up to the stove. |
The stove also requires that a damper is installed in the
first pipe. This is a 6 inch pipe which requires a 6 inch damper. I dry fitted
the damper into the pipe making sure that when it opens, the second pipe doesn’t
interfere with it. This means I set it about 5 inches from the top of the black
pipe. Once I found a good location, I taped and drilled the hole for the damper
shaft. Once I got the hole drilled, I installed the damper inside the pipe.
When it was in, centered and tested, I used the shaft to tap a mark on the
opposite side of the pipe where the shaft will exit. I took out the damper,
drilled the tapped hole. Now the damper could be installed fully. With the
damper installed, I put the pipe back into the stove and secured it with a
sheet metal screw to the stove where I drilled the first hole. I then attached
the second pipe which got me closer to the support box. That second pipe is
attached to the first pipe via the crimped end and 3 sheet metal screws.
The support box came with a round smoke collar as part of
the kit. I slipped that collar into the support box. It had 4 holes for
screws, but the fit for me was tight and I didn’t feel comfortable making holes
in the support box. For my last and final connection to the chimney support
box, I used what’s called a 6 Inch Adjustable Stove Pipe Slip Joint. It saves
you from cutting your stove pipe and is cheap! The deep part of it slipped over
the black pipe I had attached to the stove. The shallow part connects to the
chimney inside the chimney support box.
This slip joint is very tightly made to go over the pipe. A trick I used
is I sprayed WD-40 on a paper towel and applied it to the outside of the pipe
and inside the Slip Joint. I was then able to have it go on the pipe and move
freely enough to adjust it. After the first firing, it quickly burned off.
So, now that the Slip Joint was on the black pipe, I carefully
slid the Slip Join up and inserted it into the chimney at the support box. I secured
it to the black pipe with 3 sheet metal screws.
With the stove finally hooked up to the chimney, all that was
left is to line the fire box with FireBrick according to the installation
instruction. Once done, we were ready for our first fire. Daryl, the builder of
the Kuuma stove, suggests burning about 3 small paper fires to cure the paint.
However, it took us about 3 good wood fires after 3 small paper fires before
the paint stopped burning off and the hot room was usable. Don’t rush it, take
your time and let it cure.
 |
| First firing of our Kuuma sauna wood burning stove. |
 |
| Wood burning Kuuma sauna stove with the lights turned off. |

No comments:
Post a Comment
Would love to hear your comments, ideas, questions, and suggestions!