Aug 31, 2015

Floor framing and joist blocking- building.

So it was a nice day weather wise and also a Saturday. I found a few friends to help me out as I needed some muscle to lift and hold the 2x10s in place while we built the floor box. I made sure to have the two 12' sides sit on the outside of the 14' pieces of lumber. No particular reason why. So, I measured the 14' sides and subtracted the 3" for the front/back lumber (1.5" each) . That gave me 2 pieces at 13' 9" each. We then laid 2 pieces on the beam and while a few of the guys held them in place, I nailed 1 nail in to the joint ( L ). We went on and did the same thing of the other 3 sides. Now we had a box, but needed to make sure it was square. I tried the 3 4 5 method, but couldn't recall if you measure the inside of the wood or the outside. Since we didn't have a means to Google it :) we decided to go with the equal diagonals approach. When we measured both diagonals, they were off by 1/2 inch. After some moving and twisting, we had a square rectangle :):):)

We then put in the remaining 2 nails in to each corner to hold things in place.

Nailing the floor box together using 3" galvanized nails.

Squaring the floor box and bracing it so it doesn't move.

To keep things from getting off square, we braced all 4 corners. We then moved the box to it's final resting place on the beams with the 12' sides resting on right on the edge of the beams and the 14' side hanging equal distance off the beams.

Now as I said, I spoke to the city inspector and he told me I didn't need double rim joists. But after reading the following site where they explained that double rim joists are build to have the support and nailing place for the outside walls, I decided to go ahead and build them doubled anyway. Yes, I know, extra $, but better err on the side of caution then to realize I did it wrong.

http://www.homeownersnetwork.com/booktopic/wood-floor-framing/

Before adding the 2nd rim joists, I also bought corner brackets and put those in.

Adding a corner bracket to keep the floor box secure.

Now I went ahead and cut my lumber to fit inside. I also made sure to stagger my joints for extra stability.
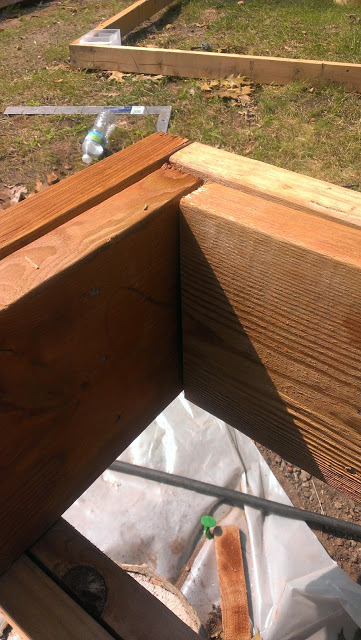
Staggering a 2nd row of 2x10s to hold up the weight of the walls.

Just like I did on the double 2x10s for the beams, I nailed 3 nails in a vertical line, every 16" on all the rim joists. Finally, we went ahead and attached the Hurricane Ties to keep the structure in place. We had 6 total, 3 on each side connecting the box to the beams.

Securing the floor box to the beams with hurricane ties.

Next was the fun and relatively quick job of hanging the joists. Using hangers on both side and one hurricane clip on each joist crossing the middle beam, we hung all the joists. As it was getting late and we were pretty tired, we only installed a few blocks and left the rest for later.
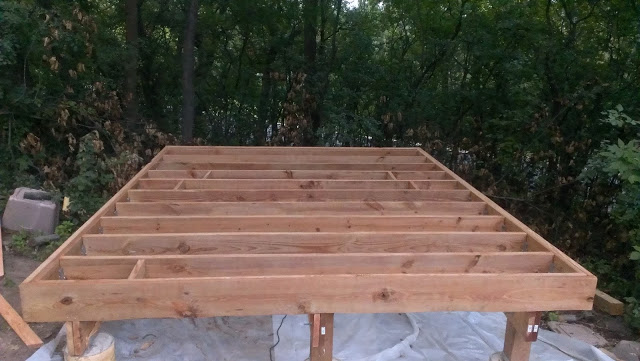
Building the floor box joist and hanging them on hanger.


Joists hanging on hangers and tied to beams with special joist ties.

Completed floor joists.
Completed joists.

Next step is to finish installing blocking, put in the 2" Pink Panther Styrofoam insulation and blocks to hold it in. Then plywood and drain.

As we were wrapping up, we started discussing the sauna layout-- the changing/beer room and the hot room. Looking at the assembled floor, I wasn't sure if the original plan of 7x12 for each of the rooms was the best idea. Though we spent about an hour thinking about it, we decided to sleep on it because none of us could agree to one plan. 

Aug 30, 2015

Floor framing and joist blocking- research and planning.

As I’m starting to research the next step, building the floor box and joist, I am once again learning that different builders do things differently, not necessarily right, but differently :) Since I’m not a builder or a structural engineer, I can only try and use my common sense and Google—a bad combo.

First, I’ve noticed there are many examples online of how a floor is built. They all look good, but I don’t think they’re all correct. I recently learned that there’s a wood standards company that publishes the numbers for how far a wood board can span. All that depends on the wood type, and wood size-- 2x4, 2x6, 2x8… and live/dead loads it needs to carry. Here’s a handy calculator:
http://www.awc.org/codes-standards/calculators-software/spancalc

SIDE NOTE: I conservatively thought that “wood span” referred to how far the whole solid piece of lumber can go. So say a 2x8x8 has one span value and 2x8x10 has a different one. Thanks to this site, I’ve learned that the meaning is different:
http://bct.eco.umass.edu/publications/by-title/understanding-loads-and-using-span-tables/

The “span” is the distance that a piece of 2xX lumber can span between two supports. So if you have say a 2x10x16 piece and it spans 3 beams which it rests on, then it actually has a 5.3’ span between each beam—not a 16’ span.

Knowing that, I now realize I set myself up to use 2x10s when I could have gotten away with 2x8 for my 6’ spans. A waste of about $50, but I already bought the lumber, so here’s to a solid floor :)

I have also noticed that some build their floor with double rim joists. After doing more research and talking with my city inspector, I have decided to go with the single rim joist. One final thing I’m struggling with is joist blocking. You see some images on Google and the joists are not blocked at all. Some show a “girder” down the middle to break a joist span. I don’t think I need one cuz my spans are short and wood is big—he he he. But as far as blocking, I see 2 options.

1. Block the 2 cavities closer to the perimeter of the floor

2. Block all the cavities (need extra wood)

Have not yet made that decision.

Setting and securing the beams/skids/runner-- whatever you wanna call them.

Last time I went through and notched all of my 6x6 posts to have the beams rest in them. After putting all the posts back on the base brackets, I went and put up my beams to:
  1. See if everything is level.
  2. See if the notch cut sizes were correct.
Oddly enough, things were looking good. And with that confirmation, I was ready to start tightening things down. 

At first, I went ahead and tightened the base brackets down. I got them pretty tight, but was afraid to crush the washer. Later, after putting my posts in and hammering the upper part of the base bracket to make it snug around the post, I noticed that the bracket started moving on the ½ bolt which sits in the cement. Apparently I needed the brackets to be very tight. I removed the post and re-tightened all the base brackets.
Once all the posts were back on the brackets, I tried to level each one within the bracket as best as I could while also making sure that each sat flat on the base of each bracket. Once all that was done, I drilled pilot holes in the posts and used the special Simpson galvanized screws to secure the Simpson base brackets to the posts.

Attaching the 6x6 support post to the Simpson strong tie bracket.
  
With all the posts leveled and attached, I was ready to put the beams in their place. I put one 2x10 board up at a time. Once I had both boards sitting in the notches, I used a long ½ spade drill bit and drilled 2 holes in each post, diagonally from each other, to attach the beams to the posts.
Using 2 through bolts on a diagonal, we attach the 2x10 beams to the support posts.
I will need to go back and nail the two 2x10’s to each other for each beam. The nails will sit 16” apart and will use 3 nails aligned one on top of the other at each location.

Up next is the floor box, joists and plywood! Now it’s looking like something!!

With everything being ready for the floor box, I decided to use the box we initially built out of 2x4s when we were first trying to figure out where to place the sauna. It came in handy once again as we were able to preview the next step. It also alerted me to one possible sizing mistake.
The sauna I’m building is 12’ wide and 14’ long. The beams run front to back and are 14’ feet even. The floor box will sit flush with the edges of the beams along the 12’ sides and will overhang past the beams along the 14’ sides. Although we hammered the 2x4 mockup box pretty quickly, I think we forgot to calculate for the 1.5” on both sides to accommodate the rim joist thickness :) This was evident when we placed the mockup on our beams and the edges hung over the beams instead of being flush with them :) Ooops! Luckily, we didn’t cut the real 2x10s, so nothing lost. 

Aug 17, 2015

Notching 6x6 foundation posts.

After reading about the different techniques of notching posts-- what is apparently called the Rabbit Joint, I tried a few different options myself. Below, this is the technique that worked best for me.

My posts will accept the beams. The beams will sit inside the L notch. My beams are 2 2x10s nailed together. The actual width is 3" and the height is 9.25". Thus, my posts need to be notched 3" horizontally and 9.25" vertically. At least I think that's right measurements :)

To do so, the first post needed to be measured and marked. Once the first post was cut, I used it as a template and traced the cut on to each of the rest of the posts. So, here's how it went.

Notching posts:


1. Draw the cuts

Using a table saw, set the blade height to cut the post.

2. Use a table saw at it's highest setting (10" table saw blade in my case) with the marks on the post facing up and cut along the vertical line- the 9.25" cut.

3. Flip the post 180 degrees and use the cut you just made as the guide to cut on the opposite side. Notice too the lines on the table saw's table. Find a mark that the post seems to follow and use that as a guide on the other posts for cleaner straighter cuts.

4. Flip the post with the horizontal cut mark facing down and make the cut. The blade comes really close to the 3" we need.

5. Make another horizontal cut but instead of at our marked 9.25 inch spot, do it about half way. This will help in chiseling out the pieces since the blade doesn't cut all the way through.

6. With the cuts made, use a chisel to break away the blocks you've cut.

After the cuts have been made, use a pry bar or a long screwdriver to clear out the notch.

7. Finally, chisel and clean the little pieces that didn't get fully cut due to blade size.

Use a chisel to clean up the notch.

And there you have it. A cleanly notched post.


The foundation construction continues now with real Pressure Treated posts.

So, as I found out, the Pressure Treated posts I bought for less were treated to "refusal". In other words, not pressure treated enough to be useful in foundation construction. I went out and bought the real PT posts-- 6x6x10. $100 lighter, at least I had the right posts. For one, they're a lot heavier-- probably due to water/chemical content. Also, when cut, they don't break. Unless cut all the way through, the fibers can't be twist-broken. They need to be cut.

One more change to my design is initially, I was going to have the 6x6 posts at each pier. But to accommodate the height of the posts, I would have had the sauna floor beams sit too high in the air. What I changed is I'll have the highest pier be the location of what the beam sits on. The rest of the piers will have posts to level with the first pier. So, for my highest pier, I used a 4x4 Simpson bracket which will take the (2) 2x10 beams. The rest of the piers will have the notched posts accept the beams. At least that's the plan.

So, now that I had the right posts and lowered my string and re-leveled it again, I was ready to cut my new posts to the new heights.

Using a string level, I was able to find a level plane and match the posts to it.

Once the posts were cut and all level, I got back to notching. I was concerned with that part. I've read online different suggestions on how it's done. Some suggested Sawzall, some chainsaw. I tried a 7.25" circular saw-- but oddly enough, it's cutting depth is like 2.5" or less. The post is at least 5.5"-- that'd leave me with 1/2".

First attempt at notching support posts was unsuccessful.

In the end, I came up with a method that worked best for me.

Aug 12, 2015

Pressure Treated VS Treated to Refusal

I learned something new today. When I was at the store buying my 6x6 Pressure Treated posts for the foundation, I thought Pressure Treated is Pressure Treated. There were the rough 6"x6"x8' PT posts for $16 per post and there were the pretty smooth ones for $30 for the same size. Because I didn't care for the looks, I bought the cheaper ones-- 2 of them-- $30. While I was at the store again today, I was talking to the sales person and learned that there are 2 types of Pressure Treated wood. There's the Pressure Treated (fully) and Pressure Treated to Refusal (partially). That means the wood isn't fully treated through the inside and will not last as well or as long (I guess due to water contents of the wood or something, the chemicals don't penetrate fully). Unfortunately, I've already cut my 2 posts, so they're a waste now. However, I don't want to risk a crumbling foundation, so I guess I'll be buying new posts :) :(.

www.wwpinstitute.org/documents/TreatedtoRefusalAlert.pdf


Not the right pressure treated wood.

Leveling the site for posts and beams

 Today my 6x6 post base brackets arrived. Just like the store ones but $70+ cheaper online :). I went out and put them out on the piers and hand tightened the nuts with washers. I want to make sure everything works right before I make anything permanent.

As you recall, the build site is on a hill. Everything slopes down from the front left pier. Originally my intent was to have all the concrete piers level with each other. However, that would have meant forming tubes longer than 4 feet and I would have needed to support them somehow above ground. Some would have been as much as 3 feet high! I didn’t want to do that, so I planned on leveling using 6x6 posts. Now to do that, I needed to find a level plane so that I could cut my posts. We put up 6 stakes, one on each corner and 2 in the outside middle.  We then stretched the string for the perimeter of the building, across diagonals and between the 2 middle stakes. We used a string level and adjusted the strings until they were all level from all sides—left-right, front-back and diagonally on all sides. That was an interesting exercise. Due to the shape of the ground, both my buddy and I looked at the strings we tied and thought they were crooked—level with each other, but crooked from the ground perspective . However, we double, triple and whatever other checked and they all seemed to be level.

Using a string level to level the plane.

Now that we had a level plane for the building, we were ready to measure and cut the posts. The plan for the posts is to have a notch (L) on top of each 6x6 post where our beams will sit. The beams will then be held to the post with 2 8” galvanized through bolts with washers and nuts. Since we will be using (2) 2x10s nailed together for beams, our notch will have to be 3” horizontally and 9.25” vertically. If you didn’t know, a 2x10 isn’t really a 2x10 J Why would it be? The actual size is 1.5”x 9.25”. Same rule applies to all 2xs (2x4, 2x6…). It’s what’s called the “common” size.

To measure the post height, I measured from the top of the little standoff piece off the base post bracket. Not the side that we nail to the post, but the piece directly under the post that protrudes off the ground about an inch. So from that mark, I measured all the way up to our level string. Since the string is where the bottom of the beam will sit, I needed to add 9.25 to the measurement. That gave me the height of the post and accommodated the beam notch. The beam will sit in the notch and be flush with the top of the 6x6 post. We then went around and cut all the posts we could using the same technique to measure at each pier. Since it was late in the evening and we ran out of posts, we decided to use the time to prepare for the next step instead—the cutting  out the notch. Since I had a piece of a  post left over, we could practice on it. I read somewhere that a chainsaw can be used—that was a mess. The miter saw only cuts about 2.5 inches deep and is hard to maneuver around. After thinking about it some more the next day, I decided to try and make cuts on both sides of the post with a circular saw 3” in from the side of the post. That should leave me with about .5” to chisel out. Yep, a 6x6 post is actually 5.5x5.5 :) We will see another day if that works well or not.

The plane was leveled from all sides. Every string line was now level.
The plane was leveled from all sides. Every string line was now level. 

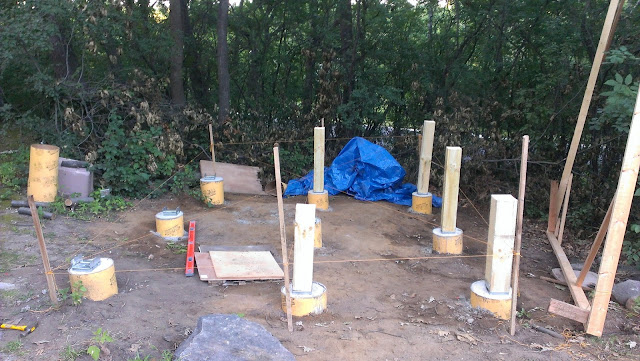
Foundation posts were cut to the level string plus 9.25" for the beam height.
Posts were cut to the level string plus 9.25" for the beam height. 

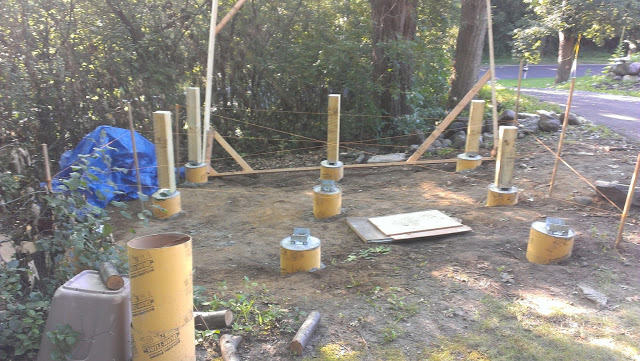
Sauna build site with string line and foundation posts.
The other side of the build site.

Aug 6, 2015

Finishing pouring the concrete piers

So the next time we had availability to work on the footings was two days later right after work. I decided to try and save a trip to the tool rental place and attempt to mix the cement by hand, in a plastic cement tub. Surprisingly, although that was harder work than using a cement mixer, it did go a lot faster. We pretty much had mixed and filled 3 tubes in about an hour. Much more meaningful exercise too than going to a health club :) Using the mixer, it took us half a day for 6 tubes. Afterwards, we went to return excess materials and to exchange the 4 x 4 Simpson post anchors for the 6 x 6 size. To my surprise, though the 4 x 4 ones were spendy for a little piece of cheap metal at almost $8 per bracket, the 6 x 6 ones ran at $20 each + tax. I would have been close to $200 on brackets alone! And remember too, we'll still need brackets that connect the posts to the skids. That was more than I wanted to pay, so I went online. There were a few places that sold the brackets cheaper. I chose an Amazon seller with good reviews. All and all, I ended up spending $135 for 10 brackets (one extra as they’re sold in 10 packs) shipped. They should come in a week, which is convenient for me as I need a week for my concrete to fully cure :) 


Completed 9 sauna foundation footing pillars
Finally finished pouring the footings. The leftover mockup of the sauna is now only there to protect from my kids getting in to the wet cement :)
Now, hopefully the next step of building the floor should be a little more interesting and rewarding.

Aug 5, 2015

AFTERTHOUGHT: Drilling the 48" deep holes for concrete piers for foundation

Having completed drilling the footings for the sauna building, I learned one thing. It is hard to control the speed, angle and depth while running the gas auger. You take the effort to carefully mark all the places the holes need to be drilled, but you get the auger positioned over the markings, start it up, and WAM! The auger goes where it wants to go—it’s possessed. Especially if it encounters rocks or roots, the auger can easily change direction. One thing I would suggest is, prior to drilling your marked holes, clear a little bit of the dirt with a shovel. You don’t have to go deep—about 6”-12” should do, but you will be able to be a lot more accurate with a shovel and once a small hole is dug, it will be harder for the auger to jump out and miss the mark when you start to drill.

Please comment below with any other suggestions you may have to make hole drilling more accurate.

Setting the concrete forming tubes and pouring concrete

So before pouring concrete in to the pillars we dug the day before, we needed to first cut the concrete forming tubes to the heights of about 6 inches above ground, then we had to level them in their holes. After that, concrete could be poured. To get them to the right size, we simply put the tubes in the holes and with a tape measure, measured 6 inches from the ground and market the tubes. Then, measured from the top of the tube to the mark we made, and did that all around to get our cut line. I had an angle grinder that worked well to cut the tubes. Once the tubes were cut to size, we used a level and measured North South and East West on top of each tube. We used pea gravel for about the bottom 6 inches of each hole for drainage and for leveling the tubes. Putting more on the one side that needed to come up to get the tube to level. Once a tube was level, one guy would hold it in position, the other would back fill with dirt. We measured multiple times along the way to make certain all was still level.
Once all the tubes were leveled and secured, we went out to buy cement and rent the cement mixer. The Simpson brackets I originally intended to use that get cemented into the concrete piers were sold out. We ended up going with the anchor bolt/bracket combo instead. We picked up the ½ inch anchor bolts that were 10 inches long. The bolts get buried about 9 inches in to the wet concrete piers. We got the 4 x 4 inch post brackets that attach to those bolt. Later, after thinking about it further, we decided that 4 x 4 inch posts would be too small for a 12 x 14 building, so we’ll need to exchange the brackets for 6 x 6 inch post brackets.

So, how hard is it to pour cement? Well, with about a 42 inch deep hole (about a 48 inch deep  minus 6 inches of pea gravel) it took about 7-8 60 pound bags of cement to fill each hole. With only me and a buddy doing the work—that’s a lot of cement to load on a trailer, unload from the trailer, then load into the concrete mixer. Then repeat (at 20 60 pound bags, my trailer was pretty much riding on rims instead of tires):) Once one tube was filled completely to the top with cement, we smoothed out the cement, ran a tight string across all 3 tubes in line and put in the anchor bolts along the string line such that later the skids will line up right through all 3 piers. The bolt stuck out only about 1 inch of threads for the bracket to attach. That was enough. Once the bolt was sunk in the concrete, we moved on to the next tube. After working for about 6 hours, we were only able to finish 6 holes with one more load of cement yet to be made some other day we have time to do this. By the way, if you’re leaving holes/tubes unfilled until the next time, cover them up so that no animals or children fall down 4 feet in the ground.
Setting the concrete forming tubes 48" deep.

Filling 3 more concrete forming tubes with cement.

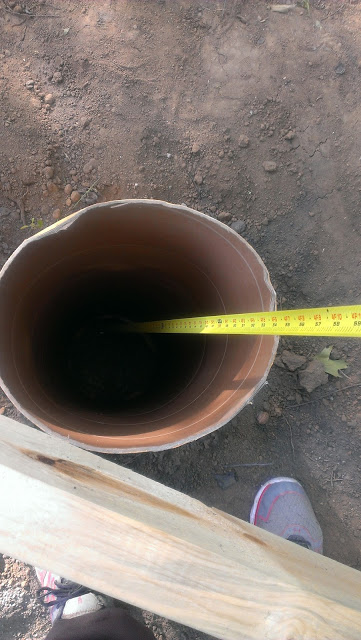
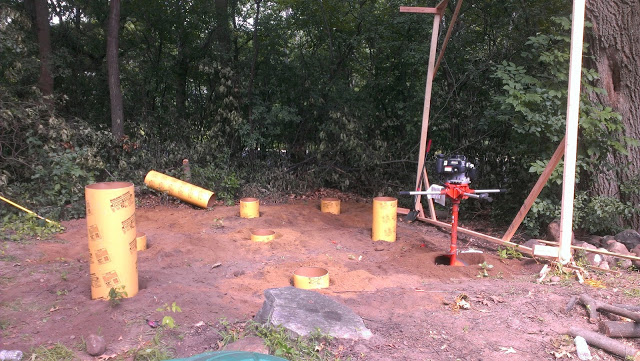
Drilling the 48" deep holes for concrete piers for foundation.

So, how hard is it to drill 9 holes 48 inches deep with a two man auger? Apparently, pretty hard. Took a better part of the day and really wore us both out. It seems easy to just turn on the auger and let it go to work. We discovered rocks, roots and even buried barb wire all of which slowed us down and made the work harder. When the auger hit the tree roots, we ended up breaking them with an axe. Then we were able to dig further. When the auger hit a big rock below, we had no way to remove that rock. We ended up leaving the hole only about 3 feet deep and used rebar hammered another 2 feet in the ground to reinforce it. The hole that had 3 layers of barb wire—we did all we could, but in the end, could not get all the wire out and so again, used rebar to reinforce. Who puts barb wire in to the ground anyway? And WHY?


Digging footing holes with a two man auger.

So, though we were confident we’d be done with digging in the 4 hours that we had for the base price of the tool rental, in the end it took us about 6-8 hrs, (with no lunch breaks) to finish digging the 9 holes. Next day, we’d be pouring concrete. That should be easy, right? :)


Finalizing everything before digging and cementing

I had a buddy who used to be in construction come by and help me plan. He brought up some good points I didn’t think of.
  1. The trees next to the sauna. They look fine now, but in a storm, they’ll be swinging. How close is too close to the roof? So I ended up removing 2 trees.
  2. What’s the sauna gonna look like as you drive up the drive way? will you be staring at a big wall of a shed or something more visually appealing?
He suggested we get some lumber and frame up a square of the actual size of the sauna. That way, unlike the string, it’ll have some dimension. This actually worked out great as we moved it and turned it a few times until we came up with something that looked good from all sides and fit all the above criteria. Also, it gave us a better idea of the steps and where they’ll need to go to reach the sauna door in relation to the asphalt driveway. String didn’t do that so well.
Once we decided on the position of the building, we went and marked 9 spots where we will drill the holes for piers. They will be 48 inches deep (6 inches of pea gravel for drainage and 42 inches of concrete). Since we’re in MN, we need to go below the frost line. Also, Quickrete tubes suggest a 6” base of pea gravel below the tubes for drainage. The 9 spots for piers were marked off at 12” from each side of the building. That way the piers will sit under the building and not stick out of the sides. The middle row of the piers was marked just half way between the 2 outters which still satisfies the max 6 foot separation. The spots were marked both with spray paint and marker flags (just in case). I found out they sell the flags at the Home Depot. I think it’s like 100 flags for $8 :)
Next, we will be drilling the holes.
Cleared the area and staked out the approximate dimensions.

Cleared building area a little more.

Constructed a true size rectangle of the building.

Once the position was finalized, marked off the locations for concrete piers.

Deciding on the general location of the sauna

After talking to the city inspector and getting the all clear, I selected the location of my future sauna. The decision was based on a few different factors.

1. The sauna will sit a clear sprint from my house-- no obstacles to run around.
2. It will be hidden by the trees from public view of the main street.
3. The space was available, so why not?


Picking the sauna building location.


After calling the service to flag any underground pipes and wires and getting an all clear, I was ready for the first steps of building my sauna-- the foundation.

Outdoor sauna layout plans-- the beginning of it all.

And so, just like many things, all crazy ideas start at a weekly guys only beer night. Building a sauna was just that. After a few beers and some discussion, a plan was devised:

Sauna building layout plans.

This wasn't just gonna  be a hot room to survive the MN winter, this was gonna be an entertainment center complete with a changing room enough to house a table for, what else, a beer night :) Seemed like a 12x14 building would be enough to have about 6 people in the hot room and about 6 in the changing room.