Sep 9, 2016

Cement over the sauna hot room floor

As you recall, I had made my sauna floor waterproof by putting down a shower pan liner—a thick waterproof membrane on the sauna floor along with a drain. I planned to leave it exposed and just put duckboard over it. However, the city inspector would not allow it and told me that I need a non-combustible floor. Although it was more work, the inspector was right.

First, every time we fired up the sauna—you could see the membrane on the floor become more malleable and less rigid.
Second, no matter how carefully we used the sauna—I noticed ash marks on the membrane that could have burned through.

All three concerns (inspector included) would be solved by cementing over the entire floor of the hot room. There could also be a potential benefit (haven’t tested yet,) that the cement floor would radiate the heat better than a PVC liner. Now, one concern is the added weight. For my hot room of about 6’x12’, I ended up using 6 bags of the Sand Topping Mix cement from Quickrete.

Sand Topping Mix cement used for sauna hot room floor.

Each bag is 60lbs alone. Plus, you add water to activate it. So, from my quick calculations, 6 x 60lbs = 360lbs + water = (Roughly) 400lbs extra weight to the sauna. That’s like 2 guys. However, I think I should be OK because:

One: the cement is spread out over the entire floor—not concentrated in one area

Two: when building the sauna, I oversized things (smart, eh?) 6” x 6” instead of 4” x 4” posts, double 10” beams instead of 8” and so on.

Anyway, then came the hard part of actually doing the work. To begin, we got everything we could out of the hot room—the less obstacles the better.  We cleaned the existing floor as well as we could for the best outcome for the cement. I made sure that all the holes or openings were well sealed on the floor membrane. This was the last chance to truly make the sauna floor waterproof. I glued down the liner around the drain hole to make sure it was sealed. I also glued the actual drain to the liner as well. Things get dirty when working with cement, so I made sure and put down a tarp over the changing room floor so nothing got ruined. Finally, I gathered my tools so I was ready for work. I used 5 tools:

A mixing tub (about $6)
A shovel
A 16” x 4” Cement Trowel (about $14)
A 6” x 4” Cement Trowel (about $8)
A 2” x 5” Cement Trowel (about $4)

Tools used to form and shape the sauna hot room floor.

The work started by putting one cement bag, wrapper and all, in the tub. I then used the shovel to cut the bag open in the middle, then flip it over to empty it out in to the tub. I then poured water in to a bucket and added it to the cement in the tub in batches, mixed, and added more water as needed. The proportions of how much water to add are on the bag. Those are the best guidelines for you. However, I am too busy to read instructions ;) besides, I’ve used cement before. I just mixed it to a state slightly more watery than wet sand at the beach. If you get it too watery, add cement. If you overdid the cement, add more water. We used the shovel to mix the cement with water. There was no water left in the tub, the cement was pretty malleable and easy to spread yet it didn’t run down like water. Anyway—read the manual :)

Mixing cement with a shovel in a cement tub.

Now, cement is not like glue—so you have some time to work with it, but you still need to be aware that as it dries, it’s harder to work with (you got about 30-40 minutes). So, I started putting it down in the hard to reach areas, such as behind the sauna stove.

First batch of cement around and behind the sauna stove.

With the Sand Topping Mix cement, there’s no aggregate (pebbles) just sand and mortar. Technically, it can be spread as thin as ¼” and still do its job. I was aiming for about a ½” thickness throughout the floor. Now remember, we have already previously given the floor a slope towards the drain from all angles of the sauna hot room. Our goal with putting down the cement is to preserve that slope. This can easily be checked with a long level after you have finished putting down a section of the cement on the floor. The cement mix is pretty thick and should hold the level tool just fine.

When forming the cement on the floor, use the longer trowel as much as you can to give the cement a nice uniform smooth look. If the big trowel doesn’t fit, switch to the smaller one. Only use the smallest trowel for detailed work and not to smooth over an area. Remember, you can always add or remove cement from an area and smooth it over again. Do that until you’ve achieved the look you want. Finally, once you confirmed that the slope still exists, and the cement is smooth and looking good, you can move on to the next hard to reach area.

Next hard to reach area of the sauna hot room floor.

Farthest section of the sauna hot room floor is done with cement.

Final section of the sauna hot room floor being cemented.

Last piece of the sauna hot room floor being cemented.

Once you have all the hard to reach areas completed, go ahead and finish off the last part. Remember to feather the cement down towards the drain right around the drain—use the small trowel. Once done, clean up and let the cement cure. Spray the tools, the tub, and the area where you mixed the cement with water to keep everything clean for next time. Next day, you can walk on your new cement hot room floor to admire your work, but give it about a week to let it fully cure before really using it.
 
Cemented sauna hot room floor 24 hours later.


First sauna firing after the cement floor was completed.

Well, I am more than pleased with how the floor turned out and what it does for the hot room. I think others agree with me as well. Not only does it look good, it's functional. We can now stack wood near the stove while we take a sauna and not worry about it ripping the waterproof liner. The cement was cool to walk on barefoot even though we had the sauna up to about 190F. The light color of the cement actually seems to make the room brighter. Overall, I am very happy with the results. We will soon see if the inspector agrees with me ;)

Jun 21, 2016

Premium specialized sauna accessories-- not required.

Once the sauna was getting close to completion, usable, but not finished, a big step for me was to start buying the accessories for it. A necessary accessory is a wooden bucket and a ladle. My go to place for both was the web. However, I was a little surprised that I had to pay $60+ for anything close to decent (a plastic water liner in a 200+F sauna? Really?). Also, it was no secret that the same buckets/ladles being sold on different websites were also sold on AliExpress at about $20 cheaper per bucket or even cheaper when bought in bulk. After exhausting all my options, I bit the bullet and bought the best deal I could find, on Amazon, which fit my needs. Grand total for the sauna bucket and ladle, about $69.

Bucket I purchased online, specifically for sauna use $45.

Ladle I purchased online specifically for Sauna use $21.55.


When everything arrived, we were excited to try them out. Both the sauna bucket and ladle looked authentic and were a great fit to all the cedar used in the sauna. Things were good, however, after the first few sessions, we noticed that the ladle sprung a leak. The ladle, advertised as being specifically for a sauna, was carved out of wood. It seemed like the cup portion of it, was carved out of a piece containing a knot. After a few more rounds of sauna, with shrinking and expending, the wood gave and the ladle split. A few sessions later, the ladle broke completely. This was a special ladle, specifically for saunas, and thus, at a premium price of $21.55.

A wooden sauna ladle cracked from use.

For a few sessions after, we ended up using Styrofoam cups and whatever else we could find to dump water on the sauna stove. One day, I was at Walmart, in the cooking accessories isle. There was a stainless steel ladle for sale, with a wooden handle—for cooking. Ladles of such material, specifically for saunas, are $40 online!! This thing, under $6.

This brings me to my main point. An item doesn’t need to be specifically made for a certain use to be charged a premium on. Below is a screenshot of ladles on Walmart.com

A regular ladle is cheap!

Now, here is the same search with the word Sauna added. Do you see my point?

A ladle with the word "Sauna", is sold at a premium.

Furthermore, as one of my friends pointed out, if you go to say HomeDepot.com and do a search for Galvanized Pail, you’ll get the following, CHEAP, results. These things will outlive your sauna by many years.

Alternative cheap sauna buckets sold at Home Depot.

So, the moral of this post is, try and find non-specialized items to be used in a sauna, in a specialized way. It may save you some money as well as frustration of buying inferior specialized products sold at a premium.

Jun 13, 2016

Outdoor Shower-- You can now use sauna in the summer!

When you think of a sauna, you probably think of massive amounts of snow and bone chilling cold. But what about 90F degree weather and blooming flowers? Can a sauna be used in the summer and actually enjoyed? Sure, with an addition of a simple outdoor shower.

You don’t need a snow bank to cool down after a sauna. The evenings here are around 70F degrees and the water coming out of the garden hose is pretty bone chilling. With a few cheap parts, we decided to build a portable outdoor shower which we use in the summer to cool down between sauna rounds. The shower is light and can be moved around the driveway to wherever we need it.

We used only green treated 2x4s and the first thing we built was the base. The base is in a form of an H and pieces are secured by outdoor screws. Then, measuring to our average heights, we cut a 2x4 to attach to the piece of the base that holds the 2 parallel pieces together. This holds the shower head and the water lines. This pieces was attached with 5 screws to the base.

The base of our outdoor DIY shower.
This is the base of our outdoor shower. Make sure the two side pieces are long enough to make the shower steady.

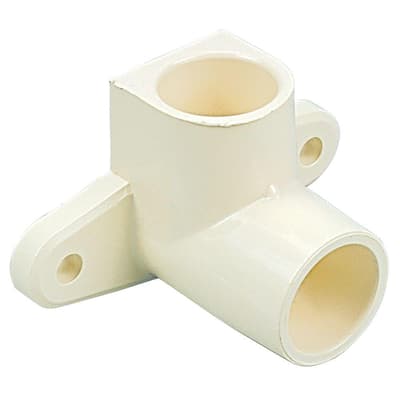
Now, the structure of our shower was complete. Next we attached the water parts. My choice was to build the shower out of CPVC ½” line. It’s easy to work with and is readily available. Make sure you use the CPVC glue for it as well. We started with mounting something called the “drop ear elbow.” Yea, I know, took some Googling on my part to find out the name:

Drop ear elbow image for where the shower head pipe screws in.
Drop Ear Elbow. This is where the shower head pipe threads in shown upside down in this photo.
http://www.homedepot.com/catalog/productImages/400/88/88eb57f5-05e0-44dc-8bfb-29e580ecaaad_400.jpg

We mounted it to where our shower head would be, at the top. We screwed it in to the 2x4 with outdoor screws with the input of it facing towards the bottom and the threaded part facing out. Make sure you get the CPVC piece since you’re working with CPVC piping. Once that was attached, we attached the mixing valve to the shower shaft where it was most convenient to operate it. The mixing valve we used is a simple one piece plastic (CPVC) type for around $5.

A $5 simple plastic mixing valve is all we needed for our outdoor shower.

You’re now starting to have the general shower layout. Next, we built the water hose input. We wanted to hide it at the bottom of the shower on the opposite side. We bought a “brass to CPVC” fitting and a coupler that threaded in to that fitting on one side and accepted a garden hose fitting on the other side. Next, we drilled a hole all the way through the bottom of the shower shaft that was big enough to hide that brass fitting in.

Garden hose screws in on the back of the outdoor shower for a cleaner look.

Once that was done and all fit in, we could start on attaching the lines. Using the ½” CPVC pipe, we cut lengths to size to connect all the components. To get the line through the hole at the bottom, we used a CPVC 90* elbow and a coupling to connect the “brass to CPVC” to the elbow. Remember to insert the pipe all the way in to the fittings and use the orange solder both inside the fittings and around the pipe that’s going in to the fittings. Once attached, you should see the orange solder outside of the joints.

Now that all the main components were connected, we used pipe straps to secure the CPVC pipes to the shower shaft to make things more rigid. Next, we need the stainless shower head pipe. We threaded it in to the “drop ear elbow” using Teflon tape. Afterwards, we attached our cheap $5 shower head to this pipe. Remember, this is an outdoor shower that will stand up to the elements—don’t spend too much on it—unless you want to :)

And with that—the shower was complete. When you build yours, fire up the sauna and give the shower about 20 minutes to cure before you can start running water through it. While the sauna warms up, put some meat on the grill and socialize. By the time you’re done, the sauna will be up to temp, and the shower cured. Go ahead and do a round in the hot room then get under the cold shower water. You will agree, your sauna is not just for winter anymore.

Fully assembled outdoor shower for after sauna use. Side view.
Fully assembled custom built outdoor shower for after sauna use. Side view.

Fully assembled outdoor shower for after sauna use. Front view.
Fully assembled custom built outdoor shower for after sauna use. Front view.

Jun 8, 2016

Sauna stove installation instructions misinterpreted.

When building an outdoor sauna, you may have the best intentions in mind. You want to do it correctly and legally. You pull a permit, purchase a UL listed stove to be compliant with the city regulations and install it by carefully following the install manual. Then, you request your final inspection and fail it. Why? Because the way you interpreted the installation manual was different than what it was trying to convey. The result? Benches need to be cut short. Flooring needs to be cemented. What is the moral here? Even though you think you understand the install instructions, contact the stove manufacturer prior to installing the stove and building around it to save yourself from redoing your work.


What happened:

Per manufacturer specs, the stove has clearances that need to be followed for safe operation. There’s side clearances of X inches to combustibles. X is the same on both sides. There’s the rear clearance Y and front clearance Z. Both front and rear clearances are different (Y does not equal Z). Where this gets interesting, and not explicitly listed in the install manual, is here. The side clearance X actually extends the whole length of the front clearance Z, on both sides. Furthermore, the “clearance to combustibles” refers not only to the wooden benches at 90 degrees to the plane of the stove, but also refers to the floor (and probably, by the same definition, to the ceiling.) Furthermore, though all the installation pictures showed the front clearance with the arrow pointing to the door of the stove, they actually meant the whole front side. Finally, although my floor was built up from non-combustible cement board and covered with PVC membrane to be waterproof, that thin piece of PVC is considered combustible—and thus non-compliant.

Shaded areas show where the combustibles clearances extend.
Shaded areas show where the combustibles clearances extend. Nothing combustible can be placed in to those areas.

Below is how I built my hot room. Because the bench is within the shaded area and the top of the floor has the PVC membrane, I am non-compliant and failed my final inspection. Now I need to cover the membrane with cement and cut half off my long sauna bench to pass the inspection.

This shows where I went wrong in my build. Part of my long bench encroaches into the no combustibles zone.
This shows where I went wrong in my build. Part of my long bench encroaches into the no combustibles zone. 

Once again, to sum up. When planning out your sauna hot room and chimney/stove installation, be sure to contact the sauna stove manufacturer and verify your understanding of the install documents is exactly what they tried to convey. Also check this with the inspector. In my case, I double checked all the installation steps with my friends and made sure we all understood them the same way. However, I should have also double checked with the stove manufacturer as well.

Finally, be aware that photos used on the stove manufacturer's website showing the sauna stove sitting right next to benches and other combustibles is only for marketing purposes and doesn’t have to be technically to the installation spec. This does not fly with the inspector either.

Sauna stove too close to wooden benches.


Sauna stove too right next to wooden benches.


Sauna stove too right next to wooden duck board.


May 11, 2016

Hot tea, cold mandarins, hot sauna.

Once all the main components of the sauna were in place, I started working on the creature comforts. Sure, there's still trim to be done, the front porch to be built and more benches to be completed, but that can wait. As my friend's dad says, "there's nothing more permanent than temporary."

Since my sauna is a bit more modern with electricity and all, I thought it would be a great addition to get an electric tea kettle for making hot tea. We later found out that it was, in fact, a great addition to our sauna. After doing a few rounds in the hot room and cooling off, a hot cup of sweet tea makes you really feel good and helps to relax. An addition of one shot of Fireball Cinnamon Whiskey mixed in to the hot tea helps to relax even more as well as takes care of the sweetness aspect.

One more food related item that works great in combination with a sauna are mandarins. In the winter, if you get your hands on a sack of mandarins, put the whole sack outside, in the snow, and let them chill. Then, between sauna rounds, have a mandarin. Not only does it taste great cold after a sauna, it also quenches your thirst.

Next time you're in a sauna-- give the above two suggestions a try, then let me know how they worked. Also, what do you do that's special in your sauna?