I am starting to see how this works. If I don’t make 3 trips
to the improvement store, the day is not over. Also, Pizza every Saturday is
now getting predictable J
The plan for this weekend was grand. We wanted to:
-finish the soffits and fascia
-put down the ice and water membrane/underlayment
-put down shingles
-put up the Tyvek
-put in windows
The buddy who does siding for a living took up the
fascia/soffits. One thing I learned is that the long sheets of soffit material
do not go on the overhang as is. Instead, they get cut down to little
rectangles that get put up from overhang to the building. So plan on that when
buying material.
 |
| Drip edge over fascia with soffit below. |
 |
| 2x6 Fascia that will get covered up with aluminum and soffit below. |
 |
| Return box being fabricated. |
The day started with me putting up the drip edge on the eaves.
Note: the drip edge gets put
on first on the eaves, with Ice and Water membrane going on top of the drip
edge. However, for the gables, the drip edge gets put on top of the Ice and
Water. Ice and Water, by the way, is the name of the rubbery underlayment that
is used on eaves and gables. Read further to find out more J.
The roll of the Ice and Water is pretty heavy to work with.
So I measured the length of the roof, added some wiggle room and cut off a
piece of the membrane on the ground. Then, rolled it up and took it up on the
roof. Each piece has 2 white plastic sheets on the bottom side, and one small
plastic strip on the opposite side. We’ll call that the top. We lined up the
underlayment with the drip edge and left some slack on the gables to be cut off
later. We rolled out the underlayment with the small strip of plastic facing up
toward the sky and towards the roof peak. Once we had everything where we
wanted, we took the top large sheet of plastic from the bottom of the
underlayment and pulled it off to expose the glue. The underlayment was now
glued from the top half. We then took the remaining bottom plastic piece off of
the underlayment and now the whole thing was secured to the roof. We then went
and put a few T50 staples through the little plastic strip that was facing up.
The instructions don’t really say what that piece is and initially we thought
we had to take off that plastic from the strip to expose the glue. As we found
later, there was no need—the plastic stays on.
Also, I had read somewhere that the Ice and Water
underlayment needs to cover at least 1 foot of the heated space. It needs to be
put down on the eaves as well as the gables. With those 2 rules, I’d have most
of the roof covered in the Ice and Water anyway, so I decided to ditch the cheaper
felt paper and do the whole roof in Ice and Water. They also say it’s better
that way—though more expansive. I ended up needing 3 rolls at $45 each.
Our next strip, we did the same thing. Cut the length of the
roof with some extra on the ground, got it up on the roof, lined up the new
piece to the bottom of the small plastic strip sticking up on the previous
sheet, peeled the plastic from the bottom, glued the sheet and put staples
through the upper strip.
We continued to lay 3 strips on each side of the roof while
leaving the ridge of the roof to be done last. Once both sides were complete,
we again cut a whole length sheet and put it over the ridge making sure it
equally overhung on both sides of the roof. The sheet was again glued by
peeling the backing and stapled.
After the underlayment was complete, we added the Drip Edge
over it on the gable sides.
 |
| Drip edge over the Ice and Water underlayment on the gables. |
Next we were ready for shingles, but first, we had to put
down the starter strips on both eaves. The starter strip looks just like the Ice
and Water, with one difference that it has blots of black glue on one edge.
That glue needs to point up to the sky and be towards the eave’s end. When
shingles are placed on top of it, the heat causes the first row of shingles to
fuse to the black glue and holds them from coming up in the rain/wind.
 |
| The shingles starter roll with the glue blots before the shingles go up. |
When I went to the store to buy shingles, there were 2
different types I needed. One package of the Ridge shingles—those that go over
the ridge. And, 11 boxes of the regular shingles. On a side note, it’s amazing
how now every trip to the store is at least $300.
So the rule with shingles is pretty simple. First row needs
to hang over the drip edge around ¼ inch. Once the first row is laid, if you
look at the shingle, there’s 2 chalk lines on each piece. The top one, you use
to put 6 roofing nails through equally spaced. The bottom line is what you use
to line up the next row of shingles by. Finally, because once again, all the
butt joins need to be staggered, the following rule is used. For the first row,
you start with a full shingle piece. 2nd row, you cut a ¼ off the
first shingle and start the row that way. You then use that ¼ piece on the end.
Next row, you’re down another fourth, so at this point, you start with ½ of a
shingle piece. Next row ¼ piece, the following row, a full piece once again. If
you do that, you’ll notice that each subsequent row covers the butt join of the
previous row very nicely.
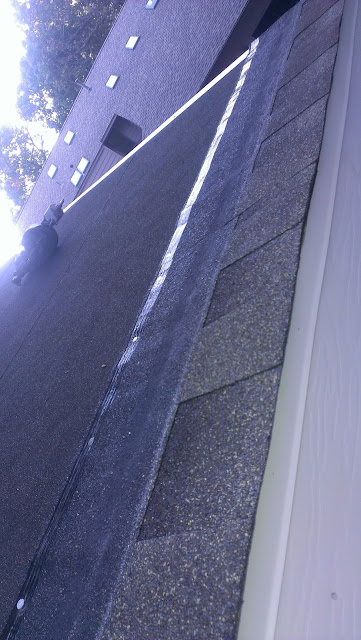 |
| First row of shingles over starter roll. |
In the midst of one of my trips to the store, the guys put
up the house wrap for me. I basically bought a 9’ roll. And, since I have about
7’ walls, things worked out perfectly. The wrap was lined up to the eves and
rolled around. We saved a few dollars by using regular staples to hold it in
place instead of the specialized plastic-top nails. We’ll just be extra careful
not to rip it. Otherwise, there are marking on the wrap for where the nails
should go, so we put staples through those markings and called it good.
 |
| Small red dots on the paper is where the staples/nails go. |
The fun thing with building this sauna is that I have all
sorts of help available from my friends. So while 2 people were doing shingles
on the roof, me and another guy took on putting in the windows.
For the windows, the following things needed to be done. The
house wrap was cut such that the “wings” were folded inside the window rough opening
on the sides and bottom. (They suggest a reverse-Y cut to be made) They were
stapled from inside the building over the window opening. A special window membrane/underlayment
was placed on the bottom sill and half way up the sides of the window rough
opening as well as the outside wall. This protects the wood from standing
water.
 |
Window underlayment glued then cut in to shape.
|
A bead of caulk was put around the outside of the window opening and the window itself was put in. Once it was shimmed from inside on the bottom and leveled, 2 nails were put in to each of the 2 top corners. The window was then shimmed and leveled on the sides, and the bottom corners received 2 nails as well. At this point, the window was secured from being out of square, and the rest of the nails were put in. Once it was all nailed up, a special aluminum tape was put over the nails on both sides of the window first, and the last strip was put over the top making sure that it extended past the side tape on both sides. And with that—both the windows were done.
 |
| Caulk the window opening for better seal. |
 |
| Ready for the window to be put in. |
 |
| And it's official! |
Once again, it was a full day of work that started at 10a
and we got a lot done. However, we ran out of daylight and so, we still need to
finish the shingles, the fascia on the back of the building and get started on
the siding, but as the temperature outside gets cooler, we’re moving right on
schedule to getting the exterior done so that we can start on the inside.
More info can be found from the following links off of my resources page:
Installing Ice and Water membrane, Felt and Drip Edge:
http://www.finehomebuilding.com/how-to/video/replacing-roof-series-apply-drip-edge.aspx
How to shingle a roof:
http://www.oneprojectcloser.com/how-to-shingle-a-roof/
How to shingle a roof (more):
http://www.building-a-home-info.com/architectural-shingles.html


