Mar 18, 2016

Sauna candle window.

The idea behind the candle window, at least as far as I understand, is simple. When you’re sitting in the hot room, you want to relax. A bright light shining in your eyes won’t help you. However, if you put a candle next to the glass through the hot room, it’ll provide just enough light to see, as well as improve your relaxation experience.

There are only a few things to keep in mind here. First, the glass needs to be made out of tempered quarter inch glass. Tempered glass can withstand something like 400F+ or about 200F more than you need. Second, the placement of the glass in to the framed window opening should be slightly off center to provide space on the window sill on the changing room side to actually put candles. Other than that, simply frame the glass in using half inch trim cut at 45 degrees and repeat on both side. That will hold the glass securely in place. One note of advice, I recommend using electronic flame-less candles—it’s just safer :)

Sauna candle window installed and framed.
Sauna candle window installed and framed. Notice the slight offset towards the hot room to provide a sill to put candles and stuff.

Mar 16, 2016

Building a sauna door from scratch.

After spending some time online trying to find a one source site on how to build a sauna door, I decided to come up with my own design based on pieces of info I found in my web search. Whether the door will hold up, time will tell, but here is how I did it.

The theory was that I needed to build a frame then cover it with insulation and cedar. The problem was that if you look at any door, you don’t see the screws in any of its sides holding the frame together. Another constraint was that both of the long sides of the door frame needed to be solid pieces. Finally, this was going to be a heavy door, but I needed to make it as light as possible. So here’s how I did it.

I estimated the door size by allowing for a 2 inch gap below the door for air intake, and .5 inch gap around it for opening and closing. Based on the door rough opening covered with trim, I got my measurements with the above criteria. I then went on to build the frame. I used pressure treated wood for my door frame. The main strength of the door needed to be in the part of the frame that hangs on the hinges (the way I see it). I took a 2x4 and took off about .5 inches from it making it 3 inches wide. I used the 1.5 inch side as the outside of the door frame all around. I made the rest of the frame pieces about 2 inches wide (from the 3.5 inch they came in). That reduced some weight. I then framed up the door with those pieces connecting them together in a form of “lap joints” using outdoor screws. A lap joint is when you cut out squares from the 2 mating pieces of wood and overlap them to make them the thickness of the original pieces. I made sure the frame was square by checking for equal diagonals, and secured the frame together with screws and corner wood pieces. We then took the door frame in to the sauna to see how it fit. It looked good and we could continue finishing it.

Measuring for a lap joint.

Completed lap joint only missing screws.

Lap joint secured.
Lap joint secured.

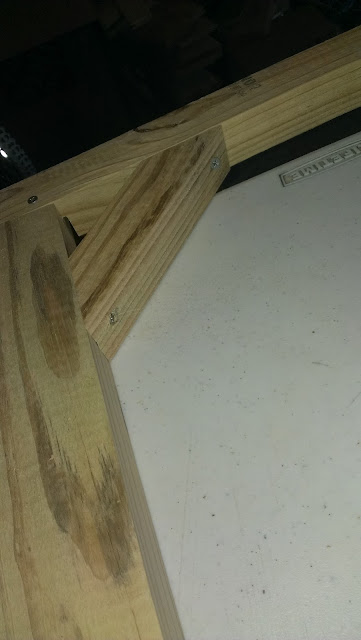
Corner anchors to prevent the frame from going out of square.

With the frame build and satisfying the above conditions, we proceeded to cover it with the same tongue and grove cedar that I used on the walls. We covered one side by putting up the T&G lengthwise and flipped the door over. With one side covered, I stapled the inside with the remaining piece of foil bubble wrap to make sure the heat didn’t escape through the door.
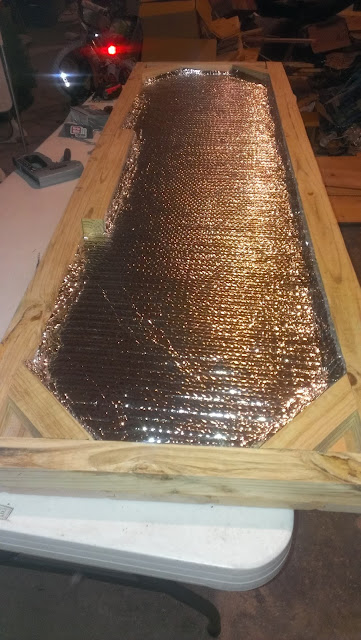

Door insulation to keep the sauna hot!

Door handle nailing plate.

I also installed a nailing surface next to the frame for the handle that will be added later and marked with a pencil the length of that nailing surface on the outside of the frame. I then went on to cover the other side of the door with cedar T&G. The T&G was attached to the frame with brads. The perimeter pieces were nailed through the cedar to the frame, The inner pieces were only nailed through the top and bottom of the cedar in to the frame.

With the door complete, we took it in to the sauna one more time to check fit. It looked nice. For our hardware, we bought three 4.5 inch hinges, two of which are spring loaded so that the door would close on its own. Leaving about a .25 inch offset, we installed the hinges on to the door frame pre-drilling and installing one screw at a time, so that the hinge didn’t move out of alignment. Once the hinges where secured to the door, we hung the door on to the door opening using at least one 2 inch screw through the hinge in to the studs. Our sauna now had a door and could be used for its real purpose!
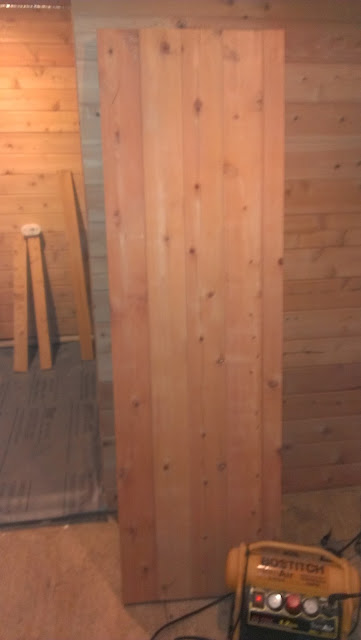
Completed custom sauna door.

Completed and hung custom sauna door.

1/19/2017 UPDATE:

Having used the sauna at least 1-2 times per week throughout the year, I am happy to report that the door has not warped or changed shape in anyway. It is still as square as it was from day one.

3/8/23 UPDATE:
Having received a few comments asking about the door hinges, I thought I post a photo of them.

Closeup of spring-loaded sauna door hinge
Closeup of spring-loaded sauna door hinge.


All 3 of spring-loaded sauna door hinges
All 3 of spring-loaded sauna door hinges.

The door uses 3 spring-loaded hinges. I could probably get away with only using 2 spring-loaded hinges, but for aesthetic purposes and to make sure they do their job, I bought 3. After properly adjusting the closing strength, the door works well. 

Hooking up the wood burning stove to the chimney.

Once we were done with the cedar on the walls and ceiling, we were ready to get the Kuuma sauna stove installed. First challenge was to get it in the sauna building. The beast is made of quarter inch metal and weighs 350 pounds and takes in 100 pounds of FireBrick luckily in a separate box J . We wheeled the stove out of the garage on a dolly, then had 3 guys pick it up and place it in to our sauna building. Once inside, we set it on top of the patio pavers that it will live on and adjusted its position to line up with the chimney in the ceiling. From there, we needed to hook up the stove to the chimney support box with a single wall black pipe. The pipe comes open and needs to be bent and clicked together to assemble like a duct pipe. There are 2 sides to each pipe—a crimped side and a straight side. The pipes are sold in 12 and 24 inch lengths I believe. There may be others. Once I assembled the pipe in to a round stack, the crimped end then went in to the stove. My stove had a hole in the receiving pipe for a sheet metal screw to secure the pipe. I put in my pipe, marked the hole location, took the pipe out, tapped and drilled the hole out.

Single wall black pipe hooked up to the stove.

The stove also requires that a damper is installed in the first pipe. This is a 6 inch pipe which requires a 6 inch damper. I dry fitted the damper into the pipe making sure that when it opens, the second pipe doesn’t interfere with it. This means I set it about 5 inches from the top of the black pipe. Once I found a good location, I taped and drilled the hole for the damper shaft. Once I got the hole drilled, I installed the damper inside the pipe. When it was in, centered and tested, I used the shaft to tap a mark on the opposite side of the pipe where the shaft will exit. I took out the damper, drilled the tapped hole. Now the damper could be installed fully. With the damper installed, I put the pipe back into the stove and secured it with a sheet metal screw to the stove where I drilled the first hole. I then attached the second pipe which got me closer to the support box. That second pipe is attached to the first pipe via the crimped end and 3 sheet metal screws.

The support box came with a round smoke collar as part of the kit. I slipped that collar into the support box. It had 4 holes for screws, but the fit for me was tight and I didn’t feel comfortable making holes in the support box. For my last and final connection to the chimney support box, I used what’s called a 6 Inch Adjustable Stove Pipe Slip Joint. It saves you from cutting your stove pipe and is cheap! The deep part of it slipped over the black pipe I had attached to the stove. The shallow part connects to the chimney inside the chimney support box.  This slip joint is very tightly made to go over the pipe. A trick I used is I sprayed WD-40 on a paper towel and applied it to the outside of the pipe and inside the Slip Joint. I was then able to have it go on the pipe and move freely enough to adjust it. After the first firing, it quickly burned off.

So, now that the Slip Joint was on the black pipe, I carefully slid the Slip Join up and inserted it into the chimney at the support box. I secured it to the black pipe with 3 sheet metal screws.


With the stove finally hooked up to the chimney, all that was left is to line the fire box with FireBrick according to the installation instruction. Once done, we were ready for our first fire. Daryl, the builder of the Kuuma stove, suggests burning about 3 small paper fires to cure the paint. However, it took us about 3 good wood fires after 3 small paper fires before the paint stopped burning off and the hot room was usable. Don’t rush it, take your time and let it cure.

First firing of our Kuuma sauna wood burning stove.

Wood burning Kuuma sauna stove with the lights turned off.

Hanging Durock protection on ceiling over the wood burning stove.

A quick post about ceiling protection above the wood burning Kuuma stove. According to the instructions for installation, I needed to have 2 half inch Durock layers of protection with a 2” air gap between them. Originally, I was going to use 4 half inch pieces of scrap Durock for spacers to give me the 2” air gap. In the end, what I decided to do is to place 2 2x4s across the ceiling joists. That gave me a solid surface for attaching the last layer of Durock, but they only made up for 1.5 inch air gap. I then added one more half inch Durock spacer over the 2x4 followed by the full sheet of protection Durock. Now that whole thing was solid and looked good with the appropriate 2” air gap.

2x4s to support final layer of Durock above the wood burning stove.

Covering the walls and ceiling with cedar tongue and groove

Well, finally, after a long process of building we were up to the big milestone step of putting up the cedar. I guess the decision to start with walls or ceiling is up to you, but I started with walls in the hot room. This work is pretty simple, better done with 2 people, and shows significant results. You do need to decide on which side of the cedar you want to use—rough or polished, and stick to it as much as possible. After that, just remember to leave an 1/8” gap on both sides of each cedar for expansion. Due to the wall framing, I put the cedar horizontally so that it can be attached with brad nails to the studs. Also, keep in mind, you probably bought the cedar T&G at the best price you could find, so the boards won’t all be perfect. Remember to presort the boards before cutting. Uglier go on the bottom and behind benches, nicest ones go to right above the benches where people’s skin will touch. You’ll probably find that some board are ugly on the side you’ve chosen to put up, but nice on the other side. Don’t worry too much and use whichever side is nicest. Unless you know which board you used the other side on, you won’t really notice it later. Also, if you haven’t done so already, now is a good time to cut open any outlets or speaker wires you may have previously covered up with the bubble foil. This is your last chance before you accidently hide something.

To begin, I started on the long wall of the hot room which was a little under 12 feet. I cut the cedar board to size, set it over the drip edge with the groove side down and put a long level on top of it. This is important as any small level imperfection here will really show up 7 feet at the top. Once the first board was level, I nailed it with the brad nails through the bottom of the tongue at all the studs. When the next piece goes over the tongue, the brads get hidden.


Leveling the starting cedar tongue and grove board.

Nail brads through the bottom of the tongue in to the wall studs.

The brads get covered by the grove of the next cedar board.

Once the first board is leveled and attached, the rest just go on top one by one, groove over tongue. One thing to remember here is to make sure the tongue is all the way in the groove before nailing each subsequent board. Again, some boards you’ll find are bowed—simply persuade them by pushing on them before putting a brad in. Do use a level with each board to make sure you’re still level. Usually, if it shows off level, means your tongue is not all the way in the groove, adjust and move on.

Go up the wall until there’s one more board left to put up, Leave it off for now. You’ll cut it to size and put it up once the ceiling is complete. At this time, move on to the opposite wall. The reason to do the opposite wall as opposed to the contiguous wall is so that the wood join pattern looks uniform. The side walls will both have cedar going over the cedar on the 2 opposite walls.

If everything is level, you’ll be surprised to see that the cedar boards line up in the corners—meaning each wall has the same row of cedar continuing—that looks nice! One issue you may run in to is going over the top of the door, or the top/bottom of the window. If you can have one continuous piece that just has the door/window cut in to it—it looks best. If not, don’t worry, you can stop your cedar at the start and end of the door, and put one separate piece above it.

A few months back, I bought ceiling speakers on CraigsList—5 for $50. I planned to use 2 in the hot room. I ran the wiring before I put up bubble foil and simply needed to cut the cedar around each of the 2 speakers and put them in. Cutting around speakers and can lights adds a little complexity, but with the right tool, it’s a non-issue. Originally, I made my cuts with the Multi-purpose tool I bought when cutting an opening for the chimney. However, later, a friend bought a jigsaw that made it even easier!

Hot room speakers installed in to cedar.

From here on, it’s just a matter of time before the walls are done up to the last board where they meet the ceiling. Before those go on, we start with the ceiling. The ceiling is done the same way, minus the level checks (I didn’t do them). One thing you need to make sure before you begin is that there are nailing surfaces everywhere to hold your cedar in place. I found out I missed some above the stove where the Durock was hung. At this stage, I ended up taking some of the bubble foil down and added my nailing studs, then stapled the bubble foil back.

To start the cedar on the ceiling, standing on a ladder, simply push the first board all the way to the wall with the groove side and nail it with brads through the bottom of the tongue to all studs. Go on putting the rest of the boards and cutting around lights and the Durock above the stove. Again, make sure each tongue is all the way in the grove the whole length of each board and nail.
Once the ceiling is complete, using a table saw if needed, cut the wall cedar to the right width. Also, because it’s the last piece at the wall & ceiling intersection, there’s not much room for it to turn. The trick here is cut the one side of the groove off on the back of the board. You can then push the board over the tongue rather than putting the tongue inside the groove. Nail on all studs with brads.

Cedar on the ceiling.

Now, with all the cedar up on the walls and ceiling, you can be proud of the progress you made. The sauna is getting close!

Wall cedar going up side wall.

More cedar tongue and groove.

Corner of two cedar tongue & groove walls.

Getting close to finishing the Tongue & Groove on the walls.

Last tongue & groove cedar connecting wall to ceiling.

Tongue & Groove cedar around the chimney Durock.